Thursday, April 26, 2012
Birthday Banner
So yesterday I made a cute little frog castle so today I made another cute little birthday item for her. Shhhh don't tell she didn't know I did this. I asked her if she had a banner she told me no she was going to purchase one -so as a surprise I made this.
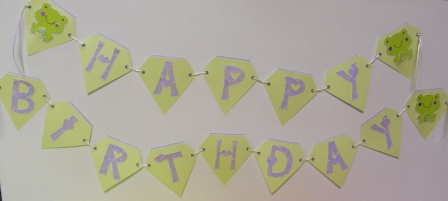
I kept w/ the theme and since I printed off all the paper I went ahead and used that to make this banner.
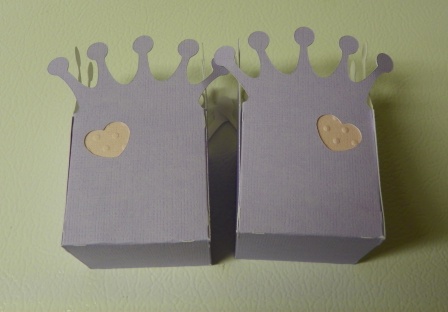
Rock Princess - for the letters cut at 3" and the diamond gems cut at 4"
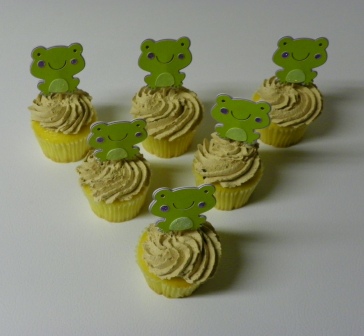
Create a critter - Frogs cut at 3" w/ shadow and layer
I used my Crop a Dile to punch 3/16" holes and then set the eyelets.
Ribbon is from Michael's
The top accent on the gem is just a border punch
Here the first few photos I added them to my large chest freezer next to where I scrapbook/craft. I then wanted to lay the whole banner out so I put on the carpet. The only problem is taking a photo of something that long. So I staggered them to touch and made it work.
I actually made them 2 separate banners so they could determine where/how they want to place them. Not sure if they will do one long or split them up.
I'll be entering this into the Magazine challenge on the Cricut blog - which is unlimited entries again this month.
Hope you enjoy and
Happy Scrappin'
Wednesday, April 25, 2012
Birthday Frog/Castle Center piece
So a couple of days ago a friend ask me to "help" make her daugthers birthday treats/display. She is only having 6 little ones over so I agreed to "help" (ummm she meant me do all the work - hahaha). So she came over and browsed my cricut library and asked what I could make. I told her anything on the cartridge. She wanted a castle and frogs, but she didn't want a princess theme. What? NO princess theme? She also told me she wanted green and purple. OK I can do that. Right? I had no green and purple paper (as I've been really using only what's in my stash). So off to the imagine I went. I printed off several sheets of paper using the cartridge Imagine more cards. PERFECT colors. I then cut all the images either w/ the imagine or the expression. Let's just say a chirping they were going.
Since, this will be for her centerpiece and putting cupcakes under the castle it would work for the Monthly Cricut challenge.
Princess Party - Castle cut at fit to page w/ layers. I think it did 11 1/2"
Princess Party - Castle treat boxes - 6" w/ the pink heart cut - and embossed
Princess Party - Scepter - 6" (she asked for them I provided)
Create a critter - Frogs - cut at 2" w/ shadow.
I took the hearts cut from the treat boxes and added them to the peaks of the castle and added purple stickles.
I also made little frog - cup cake picks. I think those are so cute.
As you can see the 1st photo - no cupcakes. Why? because I didn't have any. So I ran to the store and bought some yummy cup cakes. I added them to the castle and looks so cute when you look at it from all angles - these little sweet frogs looking at you.
Can I just say this is one of my favorite projects I think I've done and will probably do again for my daughter's birthday - maybe I'll change the colors.
Hope you enjoy and
Happy Scrappin'
Tuesday, April 24, 2012
What I do daily....
So this is the final Challenge for the Great Lakes Mega Meet. This challenge was a little more difficult - after all it's a challenge right? This was to create a layout featuring 5 things you do daily. I had to think about it for a few and then realized I didn't have any photos relating to what I do daily. So hence I took some. So here's the funny part - hubby isn't home so I had to set up the camera and do the "10 second" timer and quickly get in the photo. I had to laugh on the photos and how I "created" them.
I actually stitched on my paper w/ a real sewing machine. I bet my home economics teacher would be proud.
Paper is all from Echo Park - I am loving this new paper line. It's pinks, greens, fun patterns, flowers etc.
Country life - Letters cut 1"
I cut all the flags by hand.
Candis - in valentine pack - pinks, silvers
The journal box says: 1) Chasing a very active toddler 2) Snuggling with my girl 3)cleaning up her mess (yes she does help but I have to clean up too). 4) surf the computer 5) and crafting.
Yes I normally every day get some kind of crafting in. I either will make a card, scrapbook, or even my daughter I an do a little craft. She loves to color, cut and gooooo (glue).
Hope you enjoy and
Happy Scrappin'
Labels:
candi,
Country Life,
Echo Park Paper,
GLMM
Turtle Creek
Well last week my daughter's preschool went to Turtle Creek Farm here where we live. Let's just say 30 very excited kiddos had a blast. This isn't your typical farm. They had Emu's, Lamas, chickens, pigs, alligators, sheep, ducks, an albino hedge hog, a huge tortoise, and even European Deer. The kids had a blast and Ms. Lucy surely loves teaching these kids a thing or two about animals. She was so wonderful and my little girl keeps asking to go back and see Ms. Lucy. The preschool has now done this trip 25 years.
I think one of the highlights of this field trip was feeding the animals. My daughter loved to feed the chickens, the ducks, the sheep. The other highlight was my daughter holding the animals she loved to hold them including the snake (ewwww), and the baby alligator.
Ok enough about the farm here's the layout I made for this. When I saw the challenge at PKS I knew instantly that I wanted to use this paper. This weeks challenge at PKS was to use specific colors:
Kraft paper for the base
Imaginisce Happy camper line I think this paper is perfect has most of the colors. I added a splash of yellow.
Create a Critter - Chicken, Hedge Hog, and Pig all cut at 2.5"
Create a critter - Alligator cut at 2"
Create a Critter - grass - 1", 1.5", 2"
Banner - Arts Philosophy - 1"
Billionaire - Letters cut at 3/4"
PKS stamps for the chicken, hedge hot and pig
The layout came from a Sketch that I really love from http://www.sketchsavvy.blogspot.com/. What great inspiration for different designs.
Since this has a small banner on it too I'll be using it for another entry in the Magazine challenge on the Cricut circle blog. This month was to make a banner - and you can also enter as many times as you want. I love that.
Hope you enjoy and
Happy Scrappin'
Sunday, April 22, 2012
Baptism Banner
This months Cricut Circle magazine challenge is to make a Banner - here are the details:
Create any sort of banner you would like, just make sure to incorporate at least 4 Cricut Cuts. Please upload a working link or picture of your project to the blog under the Magazine Challenge tab. Since last month was so much fun seeing how many entries we had, we are doing it again. This month you can enter as many times as you want and we will use the number assigned to your project to randomly pick a winner. Entry deadline is May 11th. If you use Cricut Craft Room design tool, save your file so if you win, we can share it with the Circle members! The winner of this challenge will receive $150.00 credit to Cricut.com and your project picture will be featured in the magazine!
I have a friend who's little boy is getting baptised in a few weeks and I thought this would be a fun way to help decorate for his little party. I thought it would be perfect for the Challenge.
Cartridges - and sizes
Mini Monogram - for the scallop base - cut at 4"
Mini Monogram - for the circle base - cut at 3.75
Easter 2010 - for the crosses - cut at 3"
Nate's ABC - for the letters w/ the shadow feature cut at 3"
I printed the scallop/circle from the Hey Diddle Diddle imagine cartridge.
I then embossed the crosses and "inked" them w/ some Tim Holtz tattered jeans ink. I think they turned out pretty cool. I really didn't want just a plan white cross on there.
I will probably make the party favors to match in some way.
I added some beige ribbon to contrast the blue.
Hope you like and
Happy Scrappin'
Wednesday, April 18, 2012
Create a Critter Braclet and Thank you Card.
So my daughter's Preschool class is going tomorrow to a really cool farm. This isn't your usual farm. It has all kinds of different animals. My daughter is soooo excited. She actually asked if she can make something for Ms. Lucy the director. I told her sure. She instantly said a sheep. I figured then to make a cute little card for her to thank her for all her time and hard work. We've been there before with the moms group about 2 years ago so she really wasn't old enough to understand.
So for Ms. Lucy I thought she would like a little bracelet to show our appreciation. This lady is incredible - she does hundreds of tours and really loves doing it for the kids.
Create a Critter - Lamb card - cut at 3"
All the characters for the bracelet are cut Create a Critter at 3") on SHRINKY dinks. Yes that is correct Shrinky dinks.
They cut perfectly on the cricut and came out perfectly.
I didn't have any Laser SDs so I used the frost and colored them all by hand w/ my copics.
I then stamped the PKS faces on each one.
I then used my heat tool to shrink them and added them to a jump ring and onto a bracelet.
I stamped a simple little Thank you on the inside.
This is an easel style card.
I made 7 total animals - all of these animals are on her "farm". Like I said it's not your average farm. Yes it has your typical farm animals, goats, pigs, sheep, bunnies. Now there is a new baby alligator, and several new chicks. She even has a hedgehog. So this was 100% perfect for the farm.
I hope she and you like it and
Happy Scrappin'
Saturday, April 14, 2012
OK this is for real this time.. One last canvas...
OK I am cutting it close, but I couldn't sleep so I made one last canvas. Since I liked and (so did my friends) the past canvas' I went ahead and made this one too. The back story - a few months ago I agreed on FB to make a home made project for someone if they would make it for me - and pass it on. I had limited to 5 total. SO I figured I would make 1 canvas but then I became addicted to these as it was fun and really love the way they turned out.
I made this one for my mom.. SHHHH don't tell her until I give it to her in a few weeks.
My mom likes RED I don't have any red glimmer mist so PINK will have to do. I bet Karaboo (my friends daughter) is glad I didn't make this one for her. She doesn't like PINK at all.
I made a small mistake - so I'll share the tip w/ you - don't touch the canvas until it's dry.
Letter Envy - Name 4" Wow didn't know the R would be so large...
Arts Philosophy - Flowers 2.5"
Arts Philosophy - Butterfly - 1.5"
I think this will be the final one I make tonight. I may just make the other person 1 too. HMMM how fun would that be.
I know they are all looking the same but trust me they are all different. I had allot of fun making these and if you get a chance I'd recommend buying a 3 pack of canvas and playing around with it.
Happy Scrappin'
Labels:
Arts Philosophy,
Cricut Circle Challege,
Letter Envy
Friday, April 13, 2012
One final Canvas
OK since my friends liked the other canvas I made. I figured I'd made another one.
This one is for a friend of mines daugther. She loves Blue.
Letter Envy - Name - 4" - w/ layered function on Font button
Arts Philosophy - Flowers - 2"
Arts Philosophy - Butterfly - 2"
I glimmer misted this w/ Jazz Blue and also Dragon Fly - mixed the colors. It really shimmers and shines in person. I added a few stiching. Since I made the other one for her MOM I went ahead and made this for her.
I think she will like it.
The canvas is 8.5 x 11 and has a small hardware mount on the back.
Happy Scrappin'
Labels:
Arts Philosophy,
Cricut Circle Challege,
Letter Envy
Did you know... Shrinky dink style.
Did you know that if you buy the shrinky dink that is plain (not made for ink jet printers) can be Glimmer misted? Well I didn't know that until I tried.
I made this little charm pin for the fun of it.
Letter Envy - Font "T" cut at 3"
Arts Philosophy - Heart and Star at 3"
I then used the Bubble Gum Pink and Blue Jazz Glimmer mist once they were cut out. I then used SEI dye in purple. I did not let them dry I just used my heat tool and watched them shrink away. They turned out pretty cute. The purple is really dark and the heart/start are really fun and shimmery.
Well just a quick little project.
Happy Scrappin'
Labels:
Arts Philosophy,
Cricut Circle Challege,
Letter Envy
Sale Sign
One thing I love about the Cricut is making signs for yard sales. This was no different. I normally do a Mom to Mom sale every year and this is no different. I'll be selling a ton of my daugther's old clothes. Since the sale is all day long and about 300 people come through I get a little hoarse so I made a sign. I try to sell my clothes CHEAP -- because I don't want to carry them home with me. I made a quick and simple little sign.
Letter Envy - cut at 3"
Kates ABC - cut at 3"
Letter Envy - cut at 3"
Kates ABC - cut at 3"
Teacher cards
I made these little Thank you cards for my daugthers preschool teachers. When I looked at the crest on Letter Envy - w/ the layers It looked like a little chalk board.
Letter Envy - Crest cut at 3" w/ layers
Create A Critter - Apples 3" w/ layers
Kates ABC -Thank you 1".
I will be making something else for the teachers I'm sure but here's just a quick little card.
G door sign
What a quick and cute little way to make a sign for a room. My daughter(thanks allot to her preschool teachers) loves to point out letters. My daughter for most that know me goes by a nick name of G. So I thought since she loves to find "G"s I'd make this little sign for her.
I used Letter Envy - Crest layered it on Kraft card stock and cut it again out of the Brown paper from Echo Park. This is cut at fit to page which came out to be 10 1/2".
Kate's ABC - "G" w/ shadow function at 6"
The green paper is from SEI but the diamond is from Echo Park
Create a Critter - Lady but cut at 2 1/2".
I used my gel pen to stitch around the edge and added some little stickles.
Cropadile to make holes in the sign for the cute little flower eyelets
The colors match her room perfectly and so does the lady bug.
I will be attaching w/ a 3M removable wall hanger to her bedroom door. I was going to use vinyl but thought hubby might have not enjoy that.
Have a great day -
happy scrappin'
Wednesday, April 11, 2012
Three...
Where did the time go?? Really my little girl is now Three. These photos were taken by a friend who does professional photography for a living. She seems to always capture the BEST of any child - this day was no different. She got this great photo of my daugthers beautiful smile. She just shines.
I created this layout based on the sketch from http://stuckonusketches.blogspot.com/2012/03/march-30-get-to-know-me-blog-hop.html. I thought it was pretty cool but I changed it up a little. I didn't like the accent stripe at the top so I moved it to the bottom.
You will be surprized those that follow me.... THERE IS NO SEI on this page. It's all Echo Park. Oh my goodness this paper is adorable. I bought this paper soley for this layout. It really is very girly. I loved the diamond paper. Just so fun and pretty for a little 3 year old girls layout.
I used the dies from Emma at www.http://www.creativetimeforme.com/ kit called Build a Banner. I think these are adorable and worked perfectly for this.
Letter Envy - 2011 - cut at 1"
Kate's ABC - Three - cut at 1"
Kate's ABC - Butterflies cut at 3" and 2"
I added some pretty ribbon, a few rhinestones and some stickles.
Hope you enjoy and
Happy Scrappin'
MOM Album
So I admit I'm addicted to making these mini albums. I want to make one for everyone in my family. I think they are so special and would make a perfect gift.
I recently made one for my Dad and thought that I better make one for my mom too. So I designed this album with my Gypsy.
The over height of the album is 4"
Letter envy - MOM welded the words to a basic rectangle.
Arts Philosophy - photo corners at 3/4"
Stand and Salute - envelope sized at 3"
Forever Young - 1" flowers
I haven't yet determined what photo I want and need to find some MOM sayings to put on like I did w/ my dad's album.
Hope you enjoy and
Happy Scrappin'
Tuesday, April 10, 2012
Honey Bee.
A few weeks ago there was a post on the Cricut MB asking for people to make a cards for the Arkansas Children's hospital. I agreed that this would be a fun cause and agreed to make a few cards. I will say that the Cricut MB is full of fun and very giving people.
I made these cute little Honey Bee cards. I made the cards as A2 size - 4.25 x 5.5" - I used my gypsy and customized my cards. I used Letter Envy for the "Honey comb". and customized the size.
I hid a few of the small honey combs at the bottom.
I also cut the card from Letter Envy.
Create a Critter - bee cut at 3.5" -using the shadow, and the layered function.
Create a Critter - flowers cut at 1.5" (the flower on the zebra button).
I inked the edges and added some ribbon around the bottom.
The sweet faces are from PKS - using the Cute and Cuddly stamps. Since these are made for children - I thought it would be fun to add them to an Action Wobble. (LOVE those).
Hope you enjoy these and
Happy Scrappin'
Subscribe to:
Posts (Atom)
