Saturday, March 31, 2012

PKS Challenge #11


Peachy Keen Stamps is hosting another weekly challenge. This time it is to make a 3D Object - Candy Container. Well what better then a cute little Easter basket. I mean seriously who wouldn't love this candy container.

I used the Tags, Bags, Boxes, and more 2 to make the cute little basket at 7 1/4". I did the box section 1 and box section 2 so I could make it a little bigger. (I will warn if you do FIT TO PAGE it will let you cut section 1 at 8 1/2"  but then only cuts the 2nd section at 7 1/4"). So you've been warned... 

I cute PKS PK 440 Cute and Cuddly faces
The bunny is cut at 3" from Doodlecharms cartridge.
The scalloped circle is from Paper Trimmings and cut at 4".

I put 2 bunnies w/ bows and 2 w/o on the basket.

I  colored these cute little bunny faces with my copics and added some glossy accents. I actually drew on the pink inside ears.

I put some "shredded paper" in as a basket filler, added a few stuffed eggs (yes they have candy in them - mini tootsie rolls in them and mmm some smarties in Easter / Spring colors). 
Once I made the basket I had to hide it.... Why???? Because a certain little 3 year old wants some.

Well I hope you enjoy and
Happy Scrappin'

Preschool...


This layout is of my daughter for her Pre-School photo. I love looking at different sketches and seeing how I can make it mine. I found this great sketch from: http://www.sketchsavvy.blogspot.com/2011/03/januaryfebruary-sketch-for-memorable.html. and thought it was perfect. I wanted to keep this layout pretty simple. I wanted her to be the focus not all the "extras".

I used Letter Envy Cricut cartridge at 1" - for Preschool.
The ABC - 123 were all cut from Birthday Bash at 1" 
I also used the cricut basic and cut the mat.

The paper is SEI Happy Days line -
A few little cuts - and some ric rac and it was done.

I did journal on the page but after I took the photo as it has allot of personal information on it. I journaled around the long edge on the right side .

I hope you enjoy and
Happy Scrappin' 

Friday, March 30, 2012

Magazine Challenge


For this months Magazine Challenge on the Cricut Circle Blog was to make a project using the circle exclusive cartridge Letter Envy.
Can I just say that is one of my favorite font cartridges. I love the miss match letters and everything. I really love letters that have shadows, and fun layers.

A few months ago I a few of my friends on FB agreed to do a "pass it forward" crafting project. The rules were simple you agreed to make something crafty for someone if they passed it forward and made something for you.

So this was the project I made for my friend Anjie.

I used an 8x10 canvas - bought in a 3 pack from Joann's.

I sprayed it with Tattered Angels glimmer mist Dragonfly, and Jazz Blue

I used Letter Envy to cut the Letters using the function keys: Font Shadow, Font Layer, and Font.
I cut the letters at 4"
The paper is from SEI Corine paper line
The roses were cut from Arts Philosophy at 2 1/2", 3" -
The butterfly also cut from Arts Philosophy at 2".

I doodled a little with a black gel roll pen to make the butterfly look like it was flying.

I bought a few little hangers from the local home store to mount into the back.

Hope you enjoy and
Happy Scrappin'

Wednesday, March 28, 2012

PKS Challenge

For this week at PKS they are having a challenge to use Faux Stitching. I wanted to make a cute but simple little card for a friend for Easter. I used the Rabbit from Kate's ABC's and used some pretty DCWV floral fabric paper. I've had it for a while but thought it was always soooo pretty I didn't want to cut it. Well I figured this was the time.

I cut the Rabbit at 4".
The green,brown and pink is all from Joann's Core'dinations paper.

The cute little dragon fly also part of the cut - and I added a little stitching to make it look like he was flying, and then stitched around the edges. I know I used black but I didn't think the white would show on the pink. It is very very soft.

The inside just says, Happy Easter
Hope you enjoy and
Happy Scrappin'

Tuesday, March 27, 2012

Elmo's Easter basket

Ok so really this was a test card... but I love how it turned out that it will now become my daugther's Easter card.
I bought the Elmo and Friends Holiday cartridge a few months back (Ok I admit I bought it when it 1st released) because I loved the cute little cuts on it.
This was the 2nd time I had played with this cartridge. I love it.
I found the RGB codes from this site, http://www.thescrapmaster.com/p/rgb-color-codes.html. I simply used the print page function on my imagine w/ the RGB codes for Elmo and his nose.
I then cut out my cuts at 5" with all the layers.
The book shows a Yellow bunny but I thought a Pink bunny would work better.

All the paper is from Joann's  core'dinations packs.
The card is 6x6 . Just a sweet and simple little card.

I added a few little dabs of stickles and it' done.

I haven't yet picked out a sentiment but I will.

Hope you enjoy and 
Happy Scrappin'

Sunday, March 25, 2012

MARCH MONTHLY CHALLENGE: Creative Sharing Challenge!


Here they are on the wall shelf


I love making little things I can decorate for the holidays . So for this challenge I made cute little blocks for Easter and Spring... I will using this for the Cricut Monthly Challenge:

The Challenge: Create a piece of wall art (canvas, art board, sign, vinyl directly on wall, framed art, shadow box, etc.). Use at least three colors.
Rules and Guidelines: Circle Blog Challenges are open to Cricut Circle Members only. Your project must be newly created for this challenge and include at least 2 Cricut Image Cuts. You must submit a project to be entered into the Challenge Prize Drawing.
How to Enter: Submit your entry using the InLinkz tool found at the bottom of this post. Please post your full name along with your entry. Entries are due by 9:00 pm MST on Saturday, March 31st, 2012.
Prize: This month the winner will receive $150.00 in credit to Cricut.com.
Winner: The winner will be selected randomly from qualifying entries using www.random.org and will be announced on the Cricut Circle Blog on Thursday, March 1st, 2012.

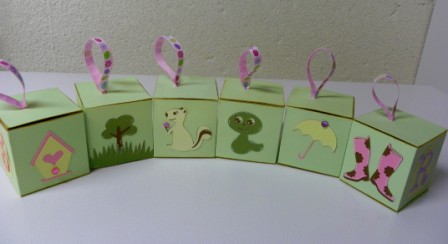
I made 6 of these cute little blocks. I used Craft card stock and cut them from Wrap It up Cartridge. These are all cut at Fit to page which came out to be 9" (however if you have set on portrait they are only 8").
The green, yellow, pink, purple  papers are from core'dinations - Soft side 
I then used Emma's stamp and dies from Hello Spring set. I cut 12 eggs out and stamped them with the coordinating decorative egg stamp. For the Spring I used the pretty flowers, for Easter I used the swirls.
I heat embossed them with some silver embossing powder.

I cut out several little Easter cuts - like the rabbits, lamb, Chickie, and basket from Easter 2010 cartridge all at 2".
The spring cuts are from April Showers - the bird house, tree, squirrel, worm, umbrella, and the cute little rain boots. These also cut at 2".
I added a few little extras - some rhineshones here, some stitching there, a little chalk, and a pretty little Spring/Easter ribbon.

I find that when you make these types of products that you don't assemble them first you add your embellishments and it makes it a lot easier. I glued the tops and side together, but left the bottom. Since, I'll probably be hosting Easter I'll fill them w/ some cute little Easter candies and put on the table.

Hope you enjoy and
Happy Scrappin'

Thursday, March 22, 2012

Jinger Adams DT try out - Hello Kitty Part 2 - Get Well


Hello Kitty Party 2:
I knew when I made the Hello Kitty Get Well Soon card that I posted previously that I also wanted to make a cute little box to go with it. I am submitting this to the FANTASTIC Jinger Adams for a chance to be on her design team. Yes, this is gonna be awesome. She is coming out with some new products. I meet Jinger a couple of years ago and she is just as sweet as can be. I loved to watch her on HSN.  She is starting a new chapter of her life coming out with some new shoes, too. Wow, she is one busy lady.

Here is some basic information regarding the DT.
Jinger Adam's and The Scrapbooking Queen are looking for talented, motivated, responsible designers who have time to commit to designing layouts, cards and projects each month with Jinger Adams products and promote Jinger Adam's products line. We haven't set a specific number of designers to add to our present team . At this time are only accepting designer who reside in the USA.

I put a lot of time and effort into this Gable box and really hope you enjoy.  I recently had a friend who had back surgery the other day and loves Hello Kitty so I made this box for her.
I wanted to make sure it was strong enough to hold a few little goodies so I made it a "double" box.

Recipe:
Cartridge: Tags, Bags, Boxes and more 2. 
To get a larger Gable box I cut 2 box sections at Fit to page - which shows 11"
I scored it first with the scoring tool (LOVE IT!!!), then cut.
Kraft card stock for the base.
I then cut Heather (purple) sections (with out scoring) and glued on top of the Kraft card stock. This makes it really stable and strong. 

The trick is not to assembly the box at this point. It is much easier to decorate flat.

Cartridge:
Hello Kitty Greetings:
Cut - HK2  3 1/2" (HK w/ flower)
Cut - HK 3 3 1/2' (HK w/bear)
Cut - HK 7 3 1/4" (HK in bed)
Cut - Flower 1 - various sizes (the flowers on the box at 1/2" and 1", and flowers on the card at 1",  1 1/2", and 2"
All are cut w/ the coordinating layers.

Cartridge:
Kate's ABC
Font and Font Shadow cut at 1"
I used brown, pink, green, yellow basic card stock from Joann's.
I added a few Bubble gum stickles to the bows.
Queen and Company Rhinestones
Wood pattern embossing folder for the bed post.
White Gel pen for stitching

The HK w/ the bear is attached using an Action Wobble (LOVE them).
The HK in bed is attached with foam adhesive

Hope you enjoy and
Happy Scrappin'

Weekly Challenge #54: Decorative Letter Challenge! ****HK Part 1 Get Well Soon


PART 1: 
For the weekly challenge for the Cricut Circle was to make a project with a decorative letters.

I recently had a friend who just had back surgery and she is a huge Hello Kitty fan. So I thought instantly about her and this card.

Here is The Challenge: Create a scrapbook page, card, home decor item, or other project where you include a word of your choice. One or more of the letters in your chosen word must be replaced by a Cricut shape. For example, replace the letter “o” in the word LOVE with a heart.
Rules and Guidelines: Circle Blog Challenges are open to Cricut Circle Members only. Your project must be newly created for this challenge and include at least 2 Cricut Image Cuts. You must submit a project to be entered into the Challenge Prize Drawing. One entry per person, please.
How to Enter: Submit your entry using the InLinkz tool found at the bottom of this post. Please post your full name along with your entry. Entries are due by 9:00 pm MST on Thursday, March 29th, 2012.
Prize: We will select one winner to receive $25 in credit added to their Cricut.com account. Please allow 4 to 6 weeks for delivery from winner announcement.
Winner: The winners will be selected randomly from qualifying entries using www.random.org and will be announced on the Cricut Circle Blog on Friday, March 30th, 2012.
I used Hello Kitty Greetings cartridge, and Kate's ABC for the letters.
I used a Swiss dot embossing folder
Paper is from Joann's .

The Hello Kitty - in the bed is sized at 3 1/2 " - with layers.
The flowers are various sizes also cut from Hello Kitty.
The letters cut at 3/4 and 1" with the font 2 and font shadow. 
I kept the card simple - and made a 5x7 easel card.

Hope you like it and
Happy Scrappin'

Tuesday, March 13, 2012

Simple Matchbook Mini Album


OK on of my local scrapbook stores holds a monthly challenge. This month was to create a page or project using October Afternoon. Use your imagination and inspire us.
The rules were simple create a project using the brand October Afternoon.

I actually saw this paper the other day at the store and thought it would be super cute. It wasn't until I checked out that the clerk told me about the October Afternoon contest. I had known about the monthly contest previously but never entered until now.

I made a cute little calendar/ purse. I used several different papers and buttons from October Afternoon.
I first must admit I saw this idea here: http://www.mycraftchannel.com/Shows/Teresa-Collins/?omedia_id=955. This was actually made by Teresa Collins. She is a very talented artist. I've seen several of her videos and follow her blog regularly. I thought this was a perfect little idea and transformed this from an album to a cute little calendar book.

Paper used:
Farmhouse - Guest Room - the polka dot/ flower
Farmhouse - Attic Trunk - lines
Fly A Kite: Lemonade - the grid

The flowers were cut from Arts Philosophy at 2.5, 3".
I also used the cute little buttons from October Afternoon for the centers of the flowers.
I added a blue ribbon from my stash I think it's from Michael's.
I printed the calendars directly onto the paper.
Hope you enjoy and
Happy Scrappin'

Sunday, March 11, 2012

Weekly Challenge #53 Cricut Circle:


This weeks challenge on the Cricut Blog was to make something you can wear for St. Patricks day and use the color green. 
Weekly Challenge #53: Wearing O’ the Green Challenge!
The Challenge: Create a pin, necklace, bracelet or something else that you can wear on St. Patrick’s Day that includes the color green.
Rules and Guidelines: Circle Blog Challenges are open to Cricut Circle Members only. Your project must be newly created for this challenge and include atleast 2 Cricut Image Cuts. You must submit a project to be entered into the Challenge Prize Drawing. One entry per person, please.
How to Enter: Submit your entry using the InLinkz tool found at the bottom of this post. Please post your full name along with your entry. Entries are due by 9:00 pm MST on Thursday, March 15th, 2012.
Prize: We will select one winner to receive $25 in credit added to their Cricut.com account. Please allow 4 to 6 weeks for delivery from winner announcement.

When I saw this I instantly thought about making a T-shirt for my daugther.
I had purchased some scraps from Hobby Lobby - in the 3 varying sizes of Green.
I also used Heat - N bod - Ultra - no sewing iron fusion (which is actually found in the notions section of Joanns and I'm sure other places).
I cut several shamrocks all from Paper Doll Dress up cartridge.
They are cut at  1.25", 1.5", 1.75", 2" 2.25", and 2.5". This was very simple to cut out fabric using the iron on fusion and the cricut expression. 

I added a few cut little shamrocks to the sleeves.

I wanted it to look like a Rainbow - and went from smallest to largest, lightest to darkest color green.
I really tried to get the model to hold still so I could take her photo but she wasn't having it. Hence this photo:


So I figured that I would try this out on someone else and seems to be a little big.. I do think Cricut loves it though (Teeeheee).


I had alot of fun making this cute little t-shirt and hope you enjoy it too.

Happy Scrappin'

Friday, March 9, 2012

BABY CARTRIDGE CHALLENGE


OK so this challenge is one I love to play along with. One of the designers of the Cricut cartridges host his own challenge. This one was to celebrate baby projects. I might add that Curt just recently had a new little addition to his family. He posted an adorable photo of his girls on his blog. You can check out the photo and the challenge by going to his blog: http://typecastcreative.blogspot.com/

This was a little hard for me as I don't have the Baby cartridge he designed. I do however have Word Collage and I thought this would be perfect for a little "room". I made a 6x6 card printing the little girls saying from Word Collage. I then used the Fancy Frames to mount it. 

The baby, crib, bear and toys were all cut from Baby Steps. The crib, baby and the bear were all cut at 2.5" and the little stacker toy was cut at 1.5" I had cut a few more elements but with all of them on there it looked a little too cluttered.

The paper is from Joann's and is the "new" core'dinations packages they are selling.
The green background is from My Minds Eye collection.

I added a few little stickles and some doodling.
I stamped the inside with Emma's stamp set All Star Baby  and it says, " Congrats on your new little miracle!".

Hope you enjoy and
Happy Scrappin'

Thursday, March 8, 2012

Magazine Sketch Challenge! Cricut Circle


My inspirational sketch


So this months magazine challenge over at the Cricut Circle was to use a sketch and create a project from that.
Here are the rules:  
Use one of the sketches provided in the Cricut Circle Magazine or on the Cricut Circle Blog, created from our designers. Please upload a working link or picture of your project to the blog under the Magazine Challenge tab. One entry per person. Entry deadline is Friday, March 9th. If you use Cricut Craft Room, save your file so you can share it in case you win! The winner of this contest will receive $150.00 credit to Cricut.com and your project picture will be featured in the magazine.

I love looking at sketches and giving my own personal twist on them. When I look at a sketch - I try not to make it identical but rather to have the similar elements/shapes.

For this challenge I used only a few cartridges.
I used Fancy Frames and cut the frame at 7". I cut both layers the dark pink and also some lighter c'rdinations pink paper.
The title is cut from Billionaire at 3/4" - I love this font for smaller fonts really fun.
The white "dots" are actually called Candi's. I LOVE these. They are like a brad w/o the prongs.

This photo happen to be of my daughert - who turned 3 this past year. All she said during this photo shot was "Look at me I"m 3" -she figured that out from the 3 balloons. The photo was takend by a dear friend who is a professional photographer. She and my daughter just love each other and I think these photos totally show it. She was 100% perfect for these photos.

I made a pocket for the journalling tab and used a journaling stamp from Emma's stamps.
I will say this happens to be one of my favorite photos of my daugther. 
Hope you enjoy and
Happy Scrappin' 

Tuesday, March 6, 2012

Throwback Thursday CRICUT-LESS CHALLENGE!!


Emma from www.creativetimeforme.com host a Throwback Thursday and from time to time she puts a little spin on the Throwback. This time it's to create a project w/o using anything electronic. That is correct. "This is a "CRICUTLESS" Challenge! Meaning, you are not allowed to use your cricuts, imagines, e2's or your cameo's or any "Electronic machine"! Basically, we are taking it back "Old School"! You are totally allowed to use punches &/or your cuttlebug!.

I love these challenges and find them really to be a challenge as I am addicted to my CRICUT. I love making stuff with it. This time I also learned a new trick to thanks to Nikki with http://scrappinnavywife.blogspot.com/. She is actually Emma's Best friend and has some really AWESOME projects. She has started paper piecing and now I think I might be addicted to that as well. It actually seemed hard but then when I watched the video Nikki sent me to watch it was pretty easy. I also found it to be very realizing.

I used some SEI paper - Birds of a Feather - butterfly garden for the flowers, and stripes.
The brown dots is also from Birds of a Feather
I don't know the actual line of paper the pink and green is but it is also from SEI.

The cupcake stamps are from EK success
The sentiment is from Emma's Stamp - "Polka Dot Surprise".
The ribbon is from Michael's
I made a little easel card which I think is my new style of cards. I love the way these look.

I hope you enjoy and
Happy Scrappin'

Peachy Challenge #7 - Sketch

So this week for the PKS challenge was to use the follow sketch to create a project.


I figured I'd play along - I just love PKS stamps and the wonderful challenges. I had a cute idea to follow this sketch using shamrocks.
I will be honest I probably made this card in my mind and then went to make it and changed it about 10 times.
I wanted to make a "swival" easel card so here was my chance. I saw this great card idea from www.cardcreationsbylorraine.blogspot.com. She did a several tutorials making different type of cards.


The shamrocks are cut at 2 1/2" from Paper Doll Dress up.
Mr. Shamrocks hat is also cut from Paper Doll Dress up - at 3".
The little shamrocks are cut at 3/4" from Paper Doll Dress up.
The faces are PK -650 Just Baby Faces.
The green card stock is from Archievers.
I inked the edges of the shamrocks with SEI Olive
The background paper is also from SEI paper line is Jocelyn - Chocolate fix.
I added some stickles to the shamrocks, some Viva decor, and a cute little bow to the pretty little girl.
The inside stamp is from Emma's stamp set called, " I Believe in Leprechauns".

Hope you enjoy and
Happy Scrappin'